Customizing Menus
Adding new positions in your menu is done via events.
You have got the Sylius\Bundle\UiBundle\Menu\Event\MenuBuilderEvent with FactoryInterface and ItemInterface of KnpMenu, this lets you manipulate the whole menu.
You’ve got eight events that you should be subscribing to:
sylius.menu.shop.account # For the menu of the MyAccount section in shop
sylius.menu.admin.main # For the Admin Panel menu
sylius.menu.admin.customer.show # For the buttons menu on top of the show page of the Customer (/admin/customers/{id})
sylius.menu.admin.order.show # For the buttons menu on top of the show page of the Order (/admin/orders/{id})
sylius.menu.admin.product.form # For the tabular menu on the left hand side of the new/edit pages of the Product (/admin/products/new & /admin/products/{id}/edit)
sylius.menu.admin.product.update # For the buttons menu on top of the update page of the Product (/admin/products/{id}/edit)
sylius.menu.admin.product_variant.form # For the tabular menu on the left hand side of the new/edit pages of the ProductVariant (/admin/products/{productId}/variants/new & /admin/products/{productId}/variants/{id}/edit)
sylius.menu.admin.promotion.update # For the buttons menu on top of the update page of the Promotion (/admin/promotions/{id}/edit)
How to customize Admin Menu?
Tip
You can browse the full implementation of these examples on this GitHub Pull Request.
Tip
Admin Panel menu is the one in the left expandable sidebar on the /admin/ url.
1. In order to add items to the Admin menu in Sylius you have to create a App\Menu\AdminMenuListener class.
In the example below we are adding a one new item and sub-item to the Admin panel menu.
<?php

namespace App\Menu;

use Sylius\Bundle\UiBundle\Menu\Event\MenuBuilderEvent;

final class AdminMenuListener
{
    public function addAdminMenuItems(MenuBuilderEvent $event): void
    {
        $menu = $event->getMenu();

        $newSubmenu = $menu
            ->addChild('new')
            ->setLabel('Custom Admin Submenu')
        ;

        $newSubmenu
            ->addChild('new-subitem')
            ->setLabel('Custom Admin Menu Item')
        ;
    }
}
2. After creating your class with a proper method for the menu customizations you need, subscribe your
listener to the sylius.menu.admin.main event in the config/services.yaml.
# config/services.yaml
services:
    app.listener.admin.menu_builder:
        class: App\Menu\AdminMenuListener
        tags:
            - { name: kernel.event_listener, event: sylius.menu.admin.main, method: addAdminMenuItems }
3. Result:
After these two steps your admin panel menu should look like that, the new items appear at the bottom:

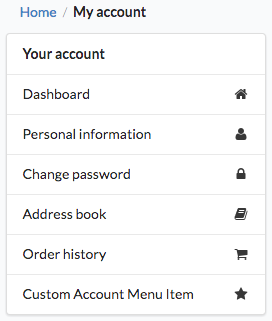
How to customize Account Menu?
Tip
My Account panel menu is the one in the left sidebar on the /account/dashboard/ url.
1. In order to add items to the Account menu in Sylius you have to create a App\Menu\AccountMenuListener class.
In the example below we are adding a one new item to the menu in the My Account section of shop.
<?php

namespace App\Menu;

use Sylius\Bundle\UiBundle\Menu\Event\MenuBuilderEvent;

final class AccountMenuListener
{
    public function addAccountMenuItems(MenuBuilderEvent $event): void
    {
        $menu = $event->getMenu();

        $menu
            ->addChild('new', ['route' => 'sylius_shop_account_dashboard'])
            ->setLabel('Custom Account Menu Item')
            ->setLabelAttribute('icon', 'star')
        ;
    }
}
As you can see above the new item can be given a route, a label and an icon.
2. After creating your class with a proper method for the menu customizations you need, subscribe your
listener to the sylius.menu.shop.account event in the config/services.yaml.
# config/services.yaml
services:
    app.listener.shop.menu_builder:
        class: App\Menu\AccountMenuListener
        tags:
            - { name: kernel.event_listener, event: sylius.menu.shop.account, method: addAccountMenuItems }
3. Result:
After these two steps your user account menu should look like that, the new item appears at the bottom:
How to customize Admin Customer Show Menu?
Tip
Admin customer menu is the set of buttons in the right top corner on the /admin/customers/{id} url.
1. In order to add buttons to the Admin Customer Show menu in Sylius you have to create a App\Menu\AdminCustomerShowMenuListener class.
Note
This menu is build from buttons. There are a few button types available:
edit, show, delete, link (default), and transition (for state machines).
Buttons (except for the link and transition types) already have a defined color, icon and label.
The link and transition types buttons can be customized with the setLabel('label'), setLabelAttribute('color', 'color')
and setLabelAttribute('icon', 'icon') methods.
The delete button must have also the resource_id attribute set (for csrf token purposes).
In the example below, we are adding one new button to the Admin Customer Show Menu. It has the type set, even though the link
type is default to make the example easily customizable.
<?php

namespace App\Menu;

use Sylius\Bundle\AdminBundle\Event\CustomerShowMenuBuilderEvent;

final class AdminCustomerShowMenuListener
{
    public function addAdminCustomerShowMenuItems(CustomerShowMenuBuilderEvent $event): void
    {
        $menu = $event->getMenu();
        $customer = $event->getCustomer();

        if (null !== $customer->getUser()) {
            $menu
                ->addChild('impersonate', [
                    'route' => 'sylius_admin_impersonate_user',
                    'routeParameters' => ['username' => $customer->getUser()->getEmailCanonical()]
                ])
                ->setAttribute('type', 'link')
                ->setLabel('Impersonate')
                ->setLabelAttribute('icon', 'unhide')
                ->setLabelAttribute('color', 'blue')
            ;
        }
    }
}
2. After creating your class with a proper method for the menu customizations you need, subscribe your
listener to the sylius.menu.admin.customer.show event in the config/services.yaml.
# config/services.yaml
services:
    app.listener.admin.customer.show.menu_builder:
        class: App\Menu\AdminCustomerShowMenuListener
        tags:
            - { name: kernel.event_listener, event: sylius.menu.admin.customer.show, method: addAdminCustomerShowMenuItems }
After these two steps your admin panel customer menu should look like that, the new item appears at right corner:

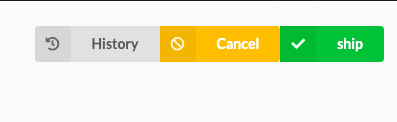
How to customize Admin Order Show Menu?
Tip
Admin order show menu is the set of buttons in the right top corner on the /admin/orders/{id} url.
1. In order to add buttons to the Admin Order Show menu in Sylius you have to create a App\Menu\AdminOrderShowMenuListener class.
Note
This menu is build from buttons. There are a few button types available:
edit, show, delete, link (default), and transition (for state machines).
Buttons (except for the link and transition types) already have a defined color, icon and label.
The link and transition types buttons can be customized with the setLabel('label'), setLabelAttribute('color', 'color')
and setLabelAttribute('icon', 'icon') methods.
The delete button must have also the resource_id attribute set (for csrf token purposes).
In the example below, we are adding one new button to the Admin Order Show Menu. It is a link type button,
that will let the admin ship the order.
<?php

namespace App\Menu;

use Sylius\Bundle\AdminBundle\Event\OrderShowMenuBuilderEvent;
use Sylius\Component\Order\OrderTransitions;

final class AdminOrderShowMenuListener
{
    public function addAdminOrderShowMenuItems(OrderShowMenuBuilderEvent $event): void
    {
        $menu = $event->getMenu();
        $order = $event->getOrder();

        if (null !== $order->getId()) {
            $menu
                ->addChild('ship', [
                    'route' => 'sylius_admin_order_shipment_ship',
                    'routeParameters' => ['id' => $order->getId()]
                ])
                ->setAttribute('type', 'transition')
                ->setLabel('Ship')
                ->setLabelAttribute('icon', 'checkmark')
                ->setLabelAttribute('color', 'green')
            ;
        }
    }
}
2. After creating your class with a proper method for the menu customizations you need, subscribe your
listener to the sylius.menu.admin.order.show event in the config/services.yaml.
# config/services.yaml
services:
    app.listener.admin.order.show.menu_builder:
        class: App\Menu\AdminOrderShowMenuListener
        tags:
            - { name: kernel.event_listener, event: sylius.menu.admin.order.show, method: addAdminOrderShowMenuItems }
After these two steps your admin panel order menu should look like that (the new item appears at right corner):
How to customize Admin Product Form Menu?
Tip
Admin product form menu is the set of tabs on your left hand side on the /admin/products/new and /admin/products/{id}/edit urls.
1. In order to add a new tab to the Admin Product Form menu in Sylius you have to create a App\Menu\AdminProductFormMenuListener class.
Note
This menu is build from tabs, each coupled with their own template containing the necessary part of the form.
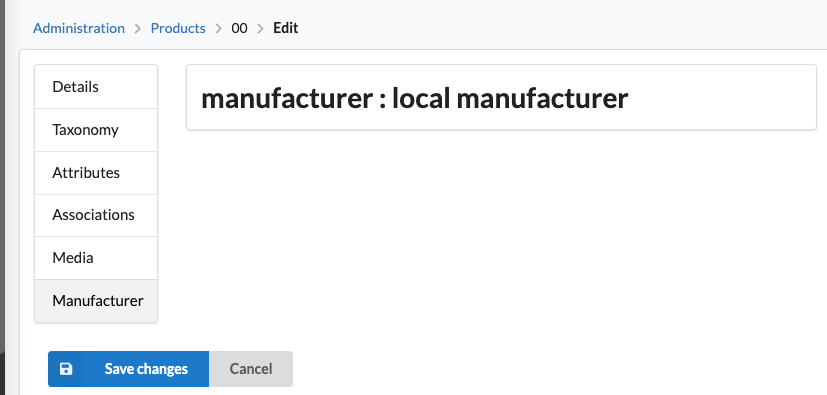
So lets say you want to add the product’s manufacturer details to the tabs.
Provided you have created a new template with all the required form fields and saved it etc.
as templates\Admin\Product\Tab\_manufacturer.html.twig, we will use it in the example below.
<?php

namespace App\Menu;

use Sylius\Bundle\AdminBundle\Event\ProductMenuBuilderEvent;

final class AdminProductFormMenuListener
{
    public function addItems(ProductMenuBuilderEvent $event): void
    {
        $menu = $event->getMenu();

        $menu
            ->addChild('manufacturer')
            ->setAttribute('template', 'Admin/Product/Tab/_manufacturer.html.twig')
            ->setLabel('Manufacturer')
        ;
    }
}
2. After creating your class with a proper method for the menu customizations you need, subscribe your
listener to the sylius.menu.admin.product.form event in the config/services.yaml.
# config/services.yaml
services:
    app.listener.admin.product.form.menu_builder:
        class: App\Menu\AdminProductFormMenuListener
        tags:
            - { name: kernel.event_listener, event: sylius.menu.admin.product.form, method: addItems }
After these two steps your admin panel product form menu should look like that (the new item appears at the bottom):
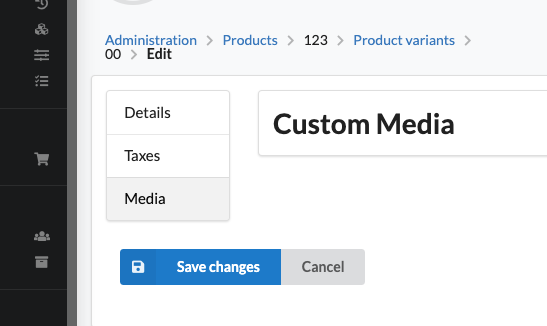
How to customize Admin Product Variant Form Menu?
Tip
Admin product variant form menu is the set of tabs on your left hand side on the /admin/product/{productId}/variants/new and /admin/product/{productId}/variants/{id}/edit urls.
1. In order to add a new tab to the Admin Product Variant Form menu in Sylius you have to create a App\Menu\AdminProductVariantFormMenuListener class.
Note
This menu is build from tabs, each coupled with their own template containing the necessary part of the form.
So lets say you want to add the product variant’s media to the tabs.
Provided you have created a new template with the required form fields and saved it etc. as templates\Admin\ProductVariant\Tab\_media.html.twig, we will use it in the example below.
<?php

namespace App\Menu;

use Sylius\Bundle\AdminBundle\Event\ProductVariantMenuBuilderEvent;

final class AdminProductVariantFormMenuListener
{
    public function addItems(ProductVariantMenuBuilderEvent $event): void
    {
        $menu = $event->getMenu();

        $menu
            ->addChild('media')
            ->setAttribute('template', 'Admin/ProductVariant/Tab/_media.html.twig')
            ->setLabel('Media')
        ;
    }
}
2. After creating your class with a proper method for the menu customizations you need, subscribe your
listener to the sylius.menu.admin.product_variant.form event in the config/services.yaml.
# config/services.yaml
services:
    app.listener.admin.product_variant.form.menu_builder:
        class: App\Menu\AdminProductVariantFormMenuListener
        tags:
            - { name: kernel.event_listener, event: sylius.menu.admin.product_variant.form, method: addItems }
After these two steps your admin panel variant menu should look like that (the new item appears at the bottom):